
|
Canon Canoscan FS4000US
What does it scan?The FS4000US is designed to scan mounted 35mm slides (up to 4 at a time), 35mm negatives or unmounted 35mm slide strips (up to 6 frames) and APS film (up to 40 exposures). There is no provision for scanning uncut rolls of 35mm film and there is no slide feeder for unattended scanning of more than 4 slides at a time. If you want to scan more than 6 frames at once, APS is your best bet (actually your only option) as the FS4000US will automatically scan all 40 frames on a roll of APS film. Scans can be made of positives (transparencies) or negatives in either in B&W at 8-bit or 14-bit depth or in color at 24-bit or 42-bit color depth. This is a 35mm film scanner of course, so it does not scan prints or medium or large format slides and negatives.
|
|||||||||||||||||||||||||
| Techspeak: If you want real numbers, at 4000 dpi the last resolved pattern is group 6, set 2, which is 72 lp/mm. The horizontal component of group 6, set 3 is resolved, corresponding to 80 lp/mm. The theoretical maximum resolution at 4000 dpi, based on the Nyquist theorem which requires sampling at twice the signal frequency, should be 78 lp/mm. These numbers are approximate since we're looking at square waves not sine waves, but still it seems clear that the scanner is operating very close to the theoretical limit of resolution. It is also apparent that the autofocus funtion is working well, since any focus errors would result in lower resolution. |
Real World Example
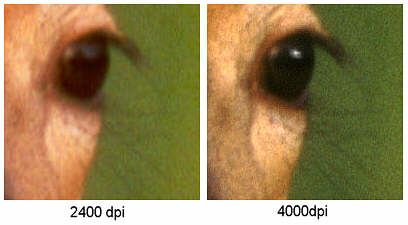
While the difference between the 2400dpi and 4000dpi scans isn't "night and day", the 4000 dpi scan clearly resolves more detail. The film grain is just starting to show up at 4000dpi, wheras at 2400dpi the grain isn't resolved. This image was shot on Sensia 100 film. With a higher resolution film like Velvia, the difference between scans at 2400dpi and 4000dpi might be expected to be greater since more detail would be recorded on the film.
Scan times
All these scan times were measured on a 550MHz AMD K6 PC (Windows 2000 Pro, 512MB RAM, 20GB free disk space) using the USB 1.1 interface. The times are from clicking on the "go" button to the end of the operation and so take into account time taken to move the slide carrier to the correct location (slide #3 in these tests) plus any other setup time as well as the actual scan and data processing and transfer time. Prior to full frame scan the scanning area was limited to the actual visible area of the mounted slide (the slide crops a little off the full frame image). The size of the full frame scans was approximately 5380 x 3550 pixels, making a 19MP image (57MB file at 24-bit color) and a 34.16mm x 22.54mm scanned area.
OPERATION |
Dust Removal OFF | Dust Removal ON Standard | Dust Removal ON Strong |
| Calibration (done once at startup) | 33s | 33s | 33s |
| Thumbnail scan (4 slides) | 15s | 15s | 15s |
| Preview scan | 38s | 54s | 54s |
| 4000dpi 24 bit full frame scan of mounted slide (5380 x 3550 pixels) | 4m 01s | 6m 28s | 6m 38s |
| 4000dpi 42 bit full frame scan of mounted slide (5380 x 3550 pixels) | 4m 13s | 6m 45 | 6m 58s |
It's interesting to note that scan times don't depend on whether the scan is done at 24 bit color depth or 42 bit color depth. This suggests that either scanning is always done at 42 bit, or that scan time is limited by the scanning itself, not by the data transfer rate. The extra time required for standard and strong dust removal is almost the same, suggesting the same algorithm is used in each case but with slightly different parameters. The scanner also has a SCSI port and connecting via SCSI may result in somewhat shorter scan times. I haven't tested this because the scanner is fast enough for my needs and I don't really want to mess with SCSI devices unless I have to! A faster processor would slightly reduce the overall times by speeding up the image processing functions (e.g. dust removal), but the difference would not likely be very significant since a faster processor won't speed up the scanner itself or the USB data transfer rate. This scanner isn't a speed king, but it's fast enough for me.
FARE (Film Automatic Retouching and Enhancement)
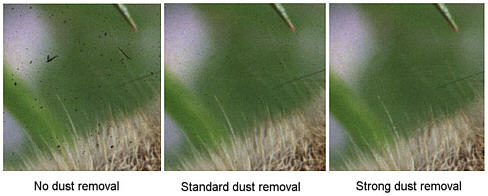
That's "dust and scratch removal" to most of us! Does it work...YES. It really does. Does it reduce sharpness...NO, or at least so little that it's hard to tell. Dust removal works by recording an infrared channel along with the usual red, green and blue channels, then using the information in the IR channel to tell the difference between dust and image. Scans take maybe 50% longer, but for a dusty slide it's well worth the extra time. The images bellow were cropped from full frame scans. Hardware techniques such as this are much more effective at dust removal than purely software techniques and cause much less loss of sharpness.
FARE does not work on conventional B&W negatives or on Kodachrome color slides. It does work on all C-41 and E-6 process films (color slides other than Kodachrome, color negatives and chromogenic B&W films). The reason it doesn't work is related to the infrared transmission characteristics of the film, which are different for C41/E6 and conventional B&W/Kodachrome.
Scanning or a Digital SLR?
I don't think there's much doubt that if your goal is digital images, you are better off shooting with a digital SLR than shooting film and scanning. It's cheaper, MUCH faster and a LOT less work. The drawback is that the digital SLR will cost you from $2000 to $8000 depending on the image quality you need. However, shooting with a digital SLR doesn't get any of your existing slides and negatives into digital form, and most photographers have LOTS of existing film based images. So even the digital SLR shooter probably still needs a film and slide scanner!
Digital SLRs are also a rapidly evolving technology, so today's new model is likely to be next month's "also ran" and next year's "obsolete model". Given that DSLRs are now fairly common, I think that we will see much slower evolution of film scanners. Higher resolution probably won't buy you much and the market for higher resolution scanners will be affected by the dropping prices on DSLRs. If I'm going to spend $2000+, I'm going to be looking at a DSLR, not a 6000dpi 35mm film scanner. So I think that now is a pretty good time to buy a scanner. Prices are reasonable, the technology isn't obsoleting new models every few months and even if higher resolution models appear, the marginal improvement in scan quality will probably be quite small. Though scanners with a larger dynamic range would certainly help with "difficult" (dense) slides, today's scanners are pretty good for 95% of properly exposed images. Canon claim a D-max of 3.4 in 24-bit mode and 4.2 in 42-bit mode for the FS4000US.
Conclusion
If you want a 4000dpi scanner with dust removal, this one is a bargain. If you want the ability to scan APS film it's even more of a bargain as it comes complete with an adapter for APS film! The scan quality is very high and the price is reasonable - in fact it's a real bargin since it has dropped from close to $1000 to around $550 over the last year. The price drop isn't because it's not a good scanner - it's a great scanner - it's just that demand for scanners has fallen since digital cameras became affordable, plus prices drop when any item of digital equipment has been around for a year or two!

Canon FS4000 at Amazon - now only $549.95
© Copyright Bob Atkins All Rights Reserved
www.bobatkins.com