|
Measuring Focal LengthWhy measure Focal Length?Unless you're testing and calibrating lenses, I'm not sure why you'd want to know the exact focal length of a lens other than simply to satisfy your curiosity. It's just something that some people want to know. If you pay for a 400mm lens, it's nice to know you have a 400mm lens, not a 370mm lens I guess. In fact most lens makers will tell you that the focal length marked on a lens is +/- 5%. That means your 400mm could be as short as 380mm and still be "within spec". Normally telephoto lenses err on the short side. It's MUCH more likely that a lens will be shorter than marked than longer. Definition of "Focal Length"Camera lenses are complex critters. In the case of a single element equi-convex thin lens, it's easy to measure focal length. You focus a point at infinity, and the distance from the center of the lens to the focal point is the focal length. However life is not so simple with a camera lens. You can still focus an object at infinity OK, but what distance do you measure? From the focus to the back of the lens, from the focus to the front of the lens or from the focus to the middle of the lens? The answer is no to all three questions. You actually measure the distance from the focus to something called the rear (or secondary) nodal point of the lens. The strict definition is: Assuming that the lens is surrounded by air or vacuum (refractive index 1.0), the focal length is the distance from the secondary principal point (which in this case is also the secondary nodal point) to the rear focal point of a lens. Where is the "rear nodal point"? Well it could be anywhere. It could be somewhere inside the lens, it could be out in front of the first element of the lens (for telephoto lenses) or it could be somewhere between the last element of the lens and the focus (for wideangle retrofocus lenses). This makes life complex. If a lens actually had the focal length that was marked on it, the rear nodal point would be one focal length in front of the film (or sensor) plane when the lens was focused at infinity. If course if the lens had the focal length marked on it, you wouldn't need to measure it! the point of doing the measurement is to see what the true focal length is! So to measure the focal length you either have to determine where the rear nodal point is, or you have to use a method of measurement which doesn't require you to know where it is. There are a number of methods of finding the nodal points of a lens, but none are simple. I won't discuss them here. Instead I'll describe a couple of methods of measuring focal length. The first method I'll call "the hard way" since it means setting up a small optical bench and making a number of linear measurements. It's the method I'd use to see what the true focal length of a close focusing zoom is. Close focusing telephoto zooms with internal focus often get that close focus by reducing the focal length. So when you have your 300mm zoom focused down to 12", it's probably only really acting as a 100mm lens. Does it matter? Well, if it does to you, this is how to measure it. The second method I'll call "the easy way". It involves taking one photograph, followed by some fairly simple image measurements and calculations. It's the method I'd use to measure the focal length of telephoto lenses focused at infinity. The Hard WayAt "A" is the target being imaged and at "B" is a screen on which the image will be focused. "A" and "B" must be greater than 4 focal lengths apart. . There are two positions for the lens which will focus an image on the screen. In the first position (upper image), a magnified image of the target will be formed. In the second position (lower image), a reduced image of the target will be formed.
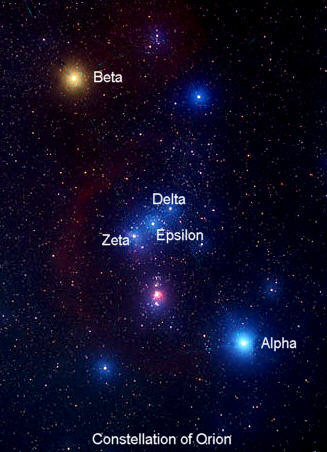
The procedure for focal length determination is as follows. Move the lens to a position where a magnified image of the target is focused on the screen. Measure "h1" (the target size) and "h2" (the image size). Also measure "d1", the distance from the target "A" to some point on the lens. It could be the front of the lens or the back of the lens. It doesn't matter. Now move the lens towards the screen "B" until a second (reduced) image is formed in sharp focus. Measure the distance "d2" from the target "A" to the same point on the lens you used in the first step. Now calculate the magnification in the first step, which is simply (h2/h1) = "m". Then calculate the distance the lens was moved, which is simply (d2-d1) = "d" The focal length of the lens is then given by: focal length = (d)/((m-(1/m)) Example: Lets say the magnification was 6x and the distance the lens had to be moved was 345mm. The focal length of the lens is thus 345/((6-(1/6)) = 345/5.833 = 59.14mm. While this seems (and is) pretty simple in principle, in practice it's not trivial to setup and to make measurements with high accuracy. If you want 1% accuracy on focal length, you need at least 1% accuracy when measuring magnification and the distance moved. Measuring magnification to a 1% accuracy is pretty difficult. Does it work in practice?To test this method I made a very rough calculation of the focal length of a Canon EF28-105/3.5-4.5 USM lens set to 105mm and focused at (1) infinity and (2) 1m. This is an internally focusing lens and so would be expected to change focal length when close focused. (1) With the lens set to infinity focus I found a magnification of 3x and a distance of 27cm between two focus conditions with the target ("A") and screen ("B") about 55cm apart. This gives a focal length of 101mm, pretty close to the specified 105mm and not bad considering the precision with which I measured magnification and distance. (2) With the lens set to 1m focus I found a magnification of 5x and a distance of 36cm between two focus conditions. This gives a focal length of 75cm, a reasonable number for a 100mm internal focus lens close focused. So yes, the method seems to work. However measuring magnification with high precision is tricky, so getting accurate numbers for focal length isn't particularly easy. The Easy WayThe easy way doesn't require you to make any manual measurements at all, which is why it's easy - and accurate. However it's only good for the lens set to infinity focus. The focal length of a non wideangle lens is closely approximated by: Focal_Length = (distance/angle) * (180/pi) [1] where angle = the angle between two distant points More accurately the formula is: Angle = 2 * arctan (distance/(2*focal_length)) or, after rearranging: Focal_length = distance/(2*tan(angle/2)) [2] The approximation error in focal length of the simpler formula [1] is about 1% at 35mm, 0.1% at 100mm and .0037% (less than 0.2mm) at 500mm Fortunately nature has given us the perfect target. The stars. They are pinpoints of light at an infinite distance and astronomers have measured their positions to an amazingly high degree of accuracy. So if we focus on a pair of stars of known angular separation and measure how far apart their images are on the film (or digital sensor), we know the focal length of the lens! Right now (winter in the northern hemisphere) Orion is a very prominent constellation and it makes a great calibration target. The three stars of Orion's belt (delta, epsilon and zeta Orionis) are nicely spaced for calibration of lenses with focal lengths from 100mm to 600mm and are bright enough to be easily seen and recognized.
The angular separation of the stars is easy to calculate, but a little tedious, so I've done it for you! The basic procedure is to get the coordinates of the stars from a star catalog. The Yale Bright Start Catalog (BS) is available for download from http://vizier.u-strasbg.fr/viz-bin/ftp-index?/ftp/cats/v/50 and lists all naked eye visible stars. It's not easy reading so be warned that finding a star's coordinates takes some effort. The angular separation between two stars is given by the expression: Cos (A) = sin(d1)*sin(d2) + cos (d1)*cos(d2)*cos (ra1-ra2) where A is the angular separation between star 1
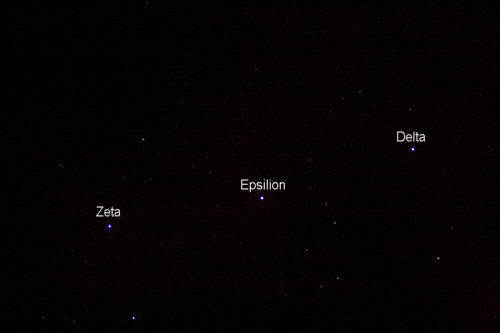
and star 2 (degrees) There are a few complications due to the fact that the stars move. The BS catalog lists positions for 1900 and 2000. Use the ones for 2000 of course. There are also corrections for annual proper motion, but in the case of the belt stars of Orion they're all moving in very nearly the same direction at very nearly the same speed, so they maintain their relative positions over long periods of time and corrections in relative position for proper motion are very small. My calculations show the following spacings: Delta to Epsilon = 1.38583 degrees So, now we have that all we need to do is take a photograph of those stars. Two things to bear in mind here. First, if there is any distortion in the image, they results will be affected. Fortunately telephoto lenses don't usually have a lot of distortion. However if they do, distortion is a function of the cube of the distance from the center of the frame, so if we keep the stars away from the edge, distortion should be negligible. Second, the earth rotates (so the stars appear to move across the sky). If you want to freeze that motion with a 500mm lens, you'll need an exposure of 1/10s or less. Fortunately these stars are bright enough that an exposure of 1/10s at f5.6 at ISO 400 or 800 is enough. As a brief aside here, the exposure required for a given star at a given ISO setting doesn't depend on the f-stop of the lens. This may seem odd, but it's true. Exposure depends on f-stop only for extended objects. A star is essentially an infinitely small point source and the (diffraction limited) size of the image is essentially the same at the same f-stop no matter what focal length lens you use. So you get the same sized image with a 500mm lens at f4 as you do with a 50mm lens at f4. For extended objects the 500mm lens would give you an image 10x as large. What exposure does depend on is the physical size of the aperture, which is given by (focal length/f-stop), so for a 500mm lens at f4 it's 500/4 = 125mm. For a 50mm lens at f4 it's 50/4 = 12.5mm. Since the amount of light collected is proportional to the area of the aperture, you'll need 100x longer exposure with the 50mm f4 lens than you need with the 500mm f4 lens to record the same star at the same brightness. With the 50mm lens at f2, you'd only need to expose for 25 times as long as the 500mm lens at f4. Absolute, precise, focus isn't needed since the star image will be a circle and you can just pick the center of the circle as the reference point from which measurements are made. However the better the focus the less exposure will be needed. Just focus manually or set the lens to "infinity". A sample image is shown below, taken with a Canon EOS 20D DSLR using a Canon EF 300/4L lens.
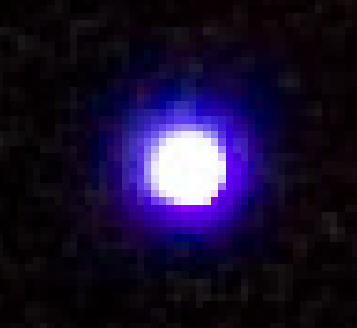
If you magnify the star images in your image editor, you'll see something like the image below:
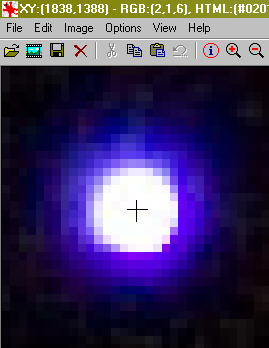
If you move the cursor to the center of the star image in most image editors, somewhere on the screen the coordinates will be displayed. For example in Irfan View they are displayed at the top right of the screen:
So in this case the center of the star image is located at pixel 1838 horizontally and pixel 1388 vertically. Now all you have to do is calculate the actual distance between the stars on the sensor. This is pretty simple. Say we shoot an image using a Canon EOS 20D DSLR and a Canon EF500/4.5L and the image coordinates of Zeta Orionis are (x1, y1) pixels and the coordinates of Epsilon Orionis are (x2, y2) pixels. The separation of those two coordinates is given by the Pythagorean theorem: (distance between stars)2 = (x1-x2)2 + (y1-y2)2 So let's say the image of Epsilon Orionis is centered at 969, 1371 and the image of Delta Orionis is centered at 2849, 1251. The distance between them (let's call it "S") is then just: S = the square root of (969-2849)2 + (1371-1251)2 = 1883.8 pixels So what's a "pixel" in terms of length? Well it's the size of the sensor divided by the number of pixels across it. For the Canon EOS EOS 20D DLSR it's 22mm and 3504 pixels, meaning a pixel corresponds to 6.4212 microns (a micron is 1/1000 mm). So 1883.8 pixels is 12.0963mm. Now we go back to the equation: Focal Length = (length)/(angle)* (180)/pi and substitute the values. Focal length = (12.0963)/(1.38583) * (180)/pi = 500.107mm Done! The focal length of the Canon EF500/4.5L turns out to be 500.1mm. It's best to do the test several times with multiple pairs of stars and average the results if you want the most accurate value. Doing this I came up with 500.15mm I did this with the Canon EF 300/4L and obtained focal lengths of 295.94, 295.59 and 297.76mm, which averages out to 295.76mm. For the Canon EF 28-135/3.5-5.6 IS set to 135mm the calculated focal length from two frames were 132.36mm and 132.42mm, which gives an average of 132.39mm Once you've calibrated a few lenses like this, you can use them as "transfer standards" for other lenses. If you shoot with the Canon EF 300/4L (focal length 295.76mm) and then shoot the same distant scene with another lens, you can compare the scale of the two images in PhotoShop (or your favorite alternative image editor). Let's say you have to reduce the size of the image shot with the Canon EF 300/4L by 5% to get an exact overlap with the image shot with the 2nd lens. That means that the second lens must have a focal length 5% less then that of the 300/4L, which would make it 281mm. So now you know!
© Copyright Bob Atkins All Rights Reserved |
|