|
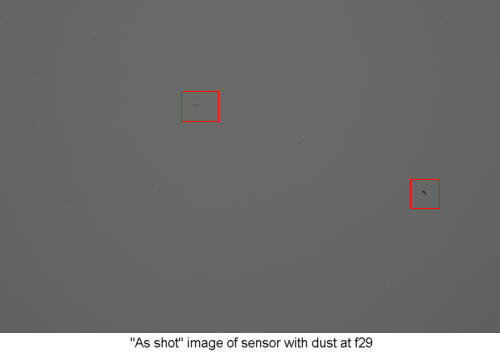
Cleaning Digital SLR Camera Sensors - Part DeuxOne of the most frequent questions I see posted in digital photography forums (second only to "what's the best digital camera...") is "what are these marks on my images". The answer is invariably that they are marks resulting from dust on the sensor of a digital SLR. The Olympus DSLRs have an ultrasonic "dust shedding" function which seems to keep them more free of dust, but all Canon DLSRs from the Digital Rebel, through the Canon EOS 20D and (presumably) 5D to the Canon EOS 1D series cameras suffer from occasional dust issues. The same applies to Nikon, Pentax and Minolta DSLRs. Eventually all of them will need to be cleaned. Below is a shot taken with a camera with a "dusty" DSLR sensor. There are a couple of dark spots visible in the red boxes. The most obvious is the one at the lower right. There is a second spot at the upper left of center, though it's actually quite difficult to spot since it is on a background of variable density and color. The lower right spot is more visible because it's on an otherwise uniform background.
How do I know these are dust spots? Well, experience tells me they look like dust spots (blurred areas of darker color), they were seen in the same place on other frames and a blank frame (see below) also shows them. Below is a frame shot of a grey card (though it could just as easily be a white card), with the lens set to f29. There are two visible dust spots outlined in red. As you can see they correspond to the spots seen on the "real world" image above, though they are smaller and darker due to the smaller lens aperture. To get a uniform exposure I use a slow shutter speed (not hard at iso 100 and f22-32), defocus the lens and move the lens around during the exposure. This blurs out any suface texture of the card or uneven illumination.
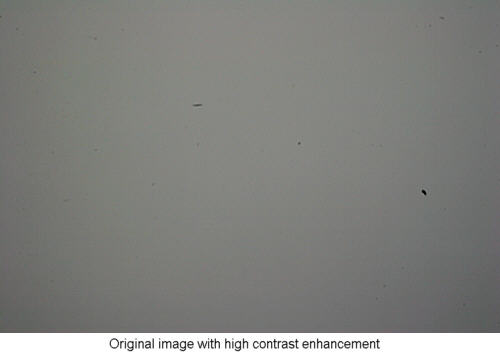
If you take the above frame and set the histogram to clip at the upper and lower limits of the uniform grey background (i.e. you "stretch" the histogram, which amounts to greatly increasing the contrast), you get the image below:
Looks pretty awful doesn't it! There's banding because we've stretched the histogram so much, there's non-uniform illumination, possibly due to lens vignetting and sensor variation, and there are now dozens of dust spots visible. However note that we only really saw two of them in the unstretched ("as shot") version of the image. Below is a less severe histogram stretch, though even this is significantly more adjustment than you'd ever use on a real world image. The two major dust spots are quite visible, along with a few others. The point to note is that the small spots don't show up on a real world image - not even a real world image of a uniform target without histogram stretching. If they don't show up, you don't really need to remove them. However the two large spots do show up, and so need to be cleaned off.
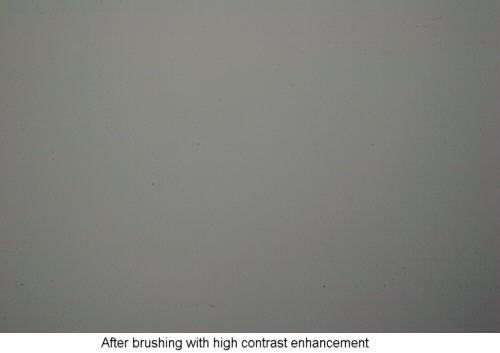
Blowing on the sensor using a blower bulb left the image essentially unchanged, so I'm not going to bother posting the result. It looks like the image above! However using a sensor brush (as described below) produced the result below. As you can see, the two major dust spots are gone and no others are visible. If I stretched the histogram enough, some small spots would show up, but as I said above, if you can't see them on normal images, you don't need to remove them. Getting a totally pristine sensor with no trace of even the smallest particle is a waste of effort and may not even be possible outside of a clean room. You'll never see them in a real image and the day after you clean the sensor, they'll probably be back!
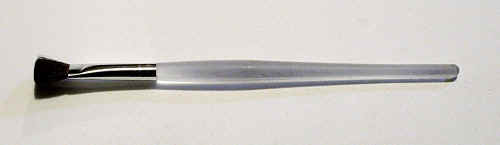
The above image shows a sensor clean enough for all photographic purposes and was the result of a single cleaning (two passes) with a small sensor brush. So what is a sensor brush?Well, it's pretty much what it sounds like. A small brush which is used to remove dust from the sensor (actually the filter which sits in front of the actual sensor). Now just how the brush removes the dust is a matter of interest. A company called "Visible Dust" introduced a line of very high tech brushes which they describe in detail on the Visible Dust website. These brushes have special bristles made of specially shaped special materials and are treated in a special way (in a plasma chamber) to give them special properties. All of this is designed to produce a brush that won't damage the sensor and will attract dust onto the bristles rather than just pushing it around on the sensor. From all accounts the Visible Dust brushes do a very good job of sensor cleaning, though they are not inexpensive (around $90 for a 1.6x sensor brush kit and around $110 for a full frame sensor brush kit). The research scientist in me wondered if you could get away with using a cheaper brush. I was not alone in this thought (see this article by Petteri Sulonen). The basics of a desirable brush are that it should use fine, soft, synthetic fiber bristles and the handle should be insulating. This will, in theory, enable the brush to hold a small electrostatic charge which will attract dust and "vacuum" it off the surface of the sensor as the brush passes over it. Well, that's the theory. I found a very inexpensive makeup brush at Wal-Mart. I don't remember what it cost. Probably less than $1. Here's a picture of it:
The most important property of the brush isn't that it removes dust, but that it doesn't mark the sensor. The brush has to be clean and free from grease and oil. You can wash it with a mild detergent and thoroughly rise it with clean water, then test it by brushing it over a clean multicoated filter a number of times. If you see any marks left, it's not clean enough to be used on a sensor. You can "charge" the brush by blowing air through the bristles (which also should blow out any trapped dust) using either a blower bulb or compressed gas. You can also charge the brush by rubbing the handle on your T-Shirt! For me this brush worked quite well in removing the dust present on my sensor as shown by the series of images above. Since the brush is only about 1cm wide it took a couple of passes to go over the whole sensor. Is it better than a Visible Dust brush? Probably not. Is it safer? I don't think so, in fact it's probably more risky. Is it cheaper? Yes, it is. Could it damage the sensor? I can't say for sure it won't. Incidentally, I recently learned that someone had Canon repair a "damaged sensor" for $180. Note that as I said above, when you're cleaning the sensor you're actually cleaning an IR blocking filter which sits in front of the sensor, so it's the filter that can be "damaged", not the sensor itself. If you damage the filter, it can be replaced without replacing the (much more expensive) sensor. $180 isn't cheap, but it's a lot cheaper than the cost of actually replacing the sensor would be. A brush like this won't remove grease or oil or other "non-dust" crud on the sensor. For that you may need a more thorough cleaning method such as I have described previously in an earlier article on sensor cleaning, involving the use of solvents and lens tisues. If you're an experimenter, you might try a few brushes to see if you can find one that works. If you're not that adventurous (or lucky) you might want to look at purchasing a commercial product like the ones produced by Visible Dust. They are expensive, but cheaper than having a damaged sensor replaced or sending you camera back to the manufacturer every few months to have the sensor cleaned by them. Visible Dust brushes and other products are available through Amazon.com:
• Visible
Dust Brush Kit for 1.6x sensors
© Copyright Bob Atkins All Rights Reserved |
|