|
Cleaning Digital Sensors - Part IDo you have dust on your DSLR sensor? Have you seen any dark spots on your images. If the answer is no, your best course of action may be to ignore the rest of this article and be happy. If you have an EOS 5D, 30D, 20D, 10D, 350D, 300D, D60, D30, 1D or 1Ds or any other digital SLR from Nikon or another manufacturer, then sooner or later you will probably feel the urge and find the need to clean the sensor. If you can't resist the urge, read on.
If you don't know if your sensor is clean and want to check, here is how to do it. Put a lens on your camera, set focus to infinity, set exposure compensation to +1, set the aperture to its smallest value (largest number), at least f22, f32 if you have it. Now hold the camera in front a uniformly illuminated target and take a shot. Look at the image. Do you see dark spots? If so you have dust. At wider apertures the dust specs will be much less visible. At f11 they may be very faint and at f8 or wider apertures they may be undetectable. Now comes the problem. If you're the sort of person who looked for dust, you're likely the sort of person who will be troubled by dust and want to remove it, even if you'd never seen it until you actually looked for it. This could get you into a lot of trouble. You now have two choices. Your first option is that you can send the camera back to Canon or your favorite repair shop. It will probably cost you $50+ and you'll probably be without your camera for 2-3 weeks, but there's a chance it will come back dust free. There's probably a bigger chance it will come back with less dust, but still a few specs. Then what do you do? Your second option is that you can try to clean it yourself. This would be great if it were not for a chance you could ruin the sensor and end up with a repair bill close to the original cost of the camera. Lots of people have cleaned their sensors themselves without running into this, but you may nor may not be one of them. I am not encouraging you to do this yourself. That's 100% your own decision. If you have doubts about whether you are qualified to do this, my advice is don't. The third option (I know I said there were two, but I just though of this one) is to pretend you never did the test, forget about the dust spots you'd never actually seen until you looked for them, and live happily ever after.
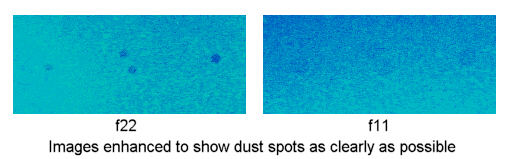
The sensor construction on the Canon EOS D60 Technical note: The dust isn't actually on the sensor surface. It's on the surface of a filter which is in front of the actual sensor itself. This is why dust shows up more at smaller apertures. Since the dust spots are some distance from the actual sensor pixels, a wide aperture lets in light which can "go around" the dust spot. It's a bit like using a large softbox for lighting. Shadows (and what shows up in the image is the shadow of the dust spot) are light and soft. At small apertures it's like using a small pinpoint spotlight and shadows are dark and hard edged. The following images show dust spots as f22 and f11. They have been GREATLY processed to show the dust spots as clearly as possible. On the straight images the spots are totally invisible at f11 and only very faintly visible at f22
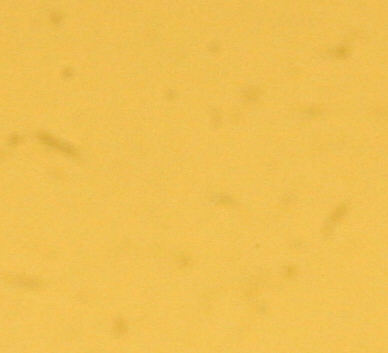
Here's what bad dust looks like at f29. This is a 100% crop from an original image, no processing applied. After cleaning no dark spots could be seen.
Method 1 - The Canon's method of digital sensor cleaning - The BlowerCanon recommend using a blower bulb, with the tip of the bulb held no further into the camera than the lens mount. This is described on page 156 of the EOS 10D manual. The theory is that with bursts of air you can blow dust off the sensor. That's the theory. The practice is somewhat different. Basically what you do is redistribute the dust inside the camera. If there's more dust on the sensor than around it, you'll probably end up with less dust on the sensor. However my attempts at this method resulted in actually more dust on the sensor than I started out with. Not good.
Note: Do not use any sort of "canned air" for this. It may be too powerful and the types that are liquid driven can "spit" liquid in the gas stream and if that happens you can wave bye-bye to your sensor. They may also freeze the sensor, which again could result in damage. Method 2 - The Vacuum BrushOK, so if a blower doesn't work, how about a brush - and not just a brush but a mini-vacuum brush. These things are sold as "computer keyboard" vacuum cleaners, however I use one on lenses quite often. The brush is soft and disturbs the dust and the vacuum sucks the dust away from the surface. NOTE Canon state "Do not use a blower brush. The brush can scratch the sensor surface". Thus using any kind of brush goes directly against the Canon advice. Obvious anything which touches the sensor surface could scratch it. You have been warned. Well, to make a long story not as long, it didn't work well. Though it didn't scratch the sensor surface, it didn't remove the dust either. In fact there seemed to be even more dust. Either that or it was more concentrated in one area. I'm not sure why this happened. Perhaps because the brush is fairly large and so you can't really move it across the sensor very well. Perhaps the brush had dust on it (though I carefully cleaned it before use)
Method 3 - Open Heart SurgeryAt this point things are significantly worse than they were before I started cleaning, so drastic measures were called for. Actually cleaning the sensor with fluid and tissue. This is the photographic equivalent of open heart surgery. If you get it wrong the consequences are pretty serious. Not as serious as open heart surgery, but perhaps serious enough to induce the need for it. If you scratch the sensor you are screwed. You won't be able to fix it, it won't be covered under warranty and you'll end up with a repair bill close to the cost of the camera. Canon will tell you that this is something you should not try at home and I'll repeat that. If you try this you are on your own. If you get it wrong you will seriously regret doing it. You have been warned. What you need is a soft but fairly rigid support, about 15mm wide by a few inches long and 1-2mm thick.. This could be a Popsicle stick, a modified plastic knife, a modified kitchen spatula (I've seen all three suggested). The idea of a soft but rigid support is that if you should turn out to be physically inept and instead of wiping the tissue across the sensor you tear the tissue and/or scrape the support across the sensor, you'd rather it was soft like plastic than hard like a diamond encrusted file. You then take a sheet of lens tissue, fold it lengthways several times until it's about 15mm wide, then fold it in half and place it over the stick as shown in the figure below. 15mm is the approximate height of the sensor in the 10D. Do NOT touch the tissue in the area which will contact the sensor. Not only will you transfer grease onto it from your fingers, you may transfer dust and grit. Running a greasy, dusty, gritty tissue across the face of the sensor is not recommended.
You then moisten the end of the "swab" with pure methanol or other high-quality, no-residue cleaning fluid such as that made by Zeiss. Do not use Windex or any similar household cleaning fluid. The key here is "moisten". You don't want liquid dripping off. It should be wet, but not that wet. You now hold your breath, engage the sensor cleaning mode on your camera to expose the sensor and gently wipe the swap across the sensor from one side to the other. The idea is to contact the whole width (height) of the sensor as you wipe across it from edge to edge. If you have to do it again you will use another clean sheet. "Clean" is your friend here.
You don't need to "scrub" the sensor or apply too much pressure, but you do want to apply enough pressure that the tissue fully contacts the sensor surface. The trick is that you don't know how much pressure this is until you've done it. Perhaps a couple of practice swipes across a filter might give you a better feel for what's required. Obviously you use a fresh piece of lens tissue before cleaning the sensor. You now do another dust test by taking a shot of a uniform bright surface with your lens stopped down to f22 or smaller. If you are lucky you will see very few (if any) dust spots. If you are unlucky you will still see multiple dust spots. If you are very unlucky you will see a scratch or other defect at which point you should probably call your psychiatrist for professional help in dealing with your suicidal feelings. If you do see some dust and you don't see any damage, you have to ask yourself "Well, punk, do you feel lucky?". If the answer is yes, you can repeat the process and hope to remove every last dust spec. If the answer is no, quit while you are ahead. The trick here is not to push your luck. Removing every last tiny spec of dust that's visible at f32 is probably not necessary. Even if you do manage to do it, within a day or two I'll bet you'll find a few dust specs back on the sensor. You do not want to clean the sensor any more frequently than absolutely necessary. You have a finite amount of luck. Don't use it up too fast. Now you can buy special cleaning swabs for this purpose. They are assembled in a clean room and sealed. The chance that they will scratch the sensor is very, very, very, very, very low (unless you get dirt on them yourself after you unwrap them). The downside is that they are $4 each and sold in packs of 12, so they will cost you $48. However this is perhaps 1/10 the cost of sensor replacement, maybe 1/20 of the cost. They are sold under the name "Sensor Swabs" and are made by Photographic Solutions Inc. You can also buy special cleaning fluid which will not damage the sensor or leave residue.
Lens tissue is MUCH cheaper of course (about $2 for 50 sheets of Kodak Lens Tissue). You want optical grade lens tissue, not stuff impregnated with silicone used to clean eyeglasses. It's not packaged in a clean room, so there's always a chance there could be a spec of grit on it. There shouldn't be (this stuff is made for cleaning lenses, not scratching them), but you won't know until it's too late. I've used lens tissue on lenses for years without a problem, including cleaning some pretty delicate optics such as dielectric laser mirrors, but if you are the unlucky one who gets that one sheet in 10,000 that may have a grit spec, it's not my fault. Again be sure it's untreated lens tissue, not silicone impregnated lens tissue sold in eyeglass stores. If you smear silicone oil over your sensor you will not be happy. Method 4 - the easy wayAfter cleaning my digital sensor a number of times, I found that quite often the "tissue and solvent" method wasn't needed and a simple brushing with a particular brush was quite effective. I've written up this method in a seperate article which you can find here: Sensor Cleaning - Part IICaution and DisclaimerDo I need to say this again? While many people have reported success in cleaning their sensors using these techniques, I've also seen a least one report of someone who damaged their sensor. If you don't have good mechanical skills and a delicate touch you might want to think a few times about whether you really want to do this. I've done it myself using lens tissue supported on a modified plastic knife. There was no damage and the sensor ended up very clean.. If I hadn't managed to do it without damage or it hadn't removed the dust, I wouldn't have written this article. You may not have such a good experience. I've read reports from photographers working in dusty conditions in Africa who cleaned their sensors every day for several weeks with no problems. However, there are no guarantees. You're on your own. If you screw up, don't blame me. Officially speaking I have to recommend you send it back to Canon for cleaning. Is that enough of a disclaimer?
© Copyright Bob Atkins All Rights Reserved |
|