|
Paint Shop Pro Version 9Tool Bars and Histograms
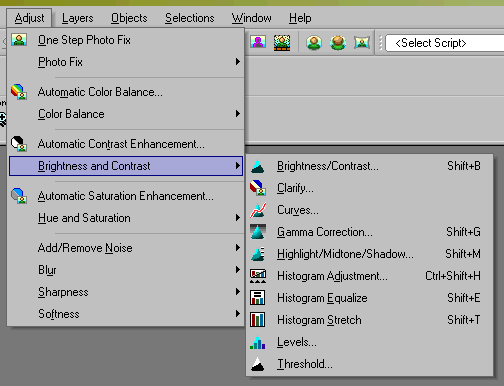
For example, PSP has the traditional tool bar down the left side of the screen. All the tools you need are there. Cropping tools, distortion correction tools, magnifying tools, various pens and brushes, dodging and burning tools, erasers, color selection tools, painting tools, text entry and manipulation tools. Since I'm not writing the manual, I'm not going to explain each one in detail, but it's not likely you'll find anything you need missing from the selection. The layout isn't perfect and the tool icons shift with their current selection. For example on the left you'll see that there are several options for the selected "slot" on the tool menu. Currently the "soften" icon is displayed. However if you selected the "Burn" icon, then the icon in the toolbar would change to the "Burn" icon also. So the tool bar reflects the current selections. This is fine unless you're looking for the "Pan" Tool. Where is it? Well it's actually one of the options for the top slot on the toolbar where the "magnify" icon (magnifying glass) is currently displayed. So to get to "pan" you have to click on the magnifying glass, then select the "pan" option. Not intuitive, but You do get used to it! Similarly to get to the "Dodge" icon you have to click on the "soften" icon, then select "dodge" from the menu (as shown above). As I said, you get used to the changing icons in the toolbar after a while and you remember what's hidden where. As an example if image adjustments, Lets look at the Histogram function. To get to this you select the "Adjust" menu, then chose "Brightness and Contrast" and "Histogram Adjust" from the sub menu.
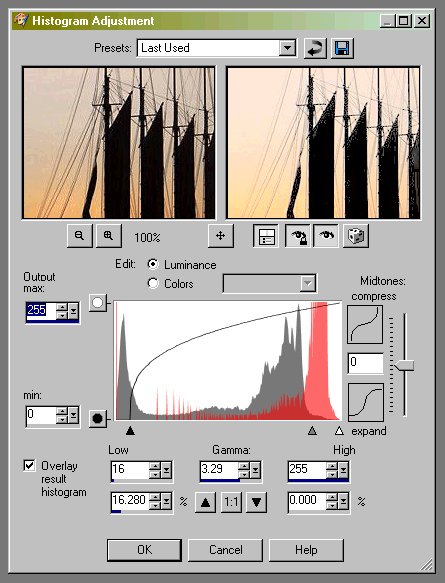
This brings up the actual histogram adjustment menu which is shown below
Here you have a pretty complete range of tools for cropping and adjusting the image via the histogram display. You can select dark, light and midpoints as well as Gamma, and edit based on luminance or color. you can zoom in or out on the image and there's a useful help file if you get confused! Note the image of the dice (last icon under the image samples). It's present in many of the dialog boxes. What it does is randomize the parameters. Each time you click you get a different set of settings. Not much use for optimizing an image, but interesting if you're fond of "special effects"! You can also save and recall and settings as a preset. NEXT: Image Adjustments and Special Effects
© Copyright Bob Atkins All Rights Reserved |
|
 So what does PSP8 do? Well, just about everything the average (and above
average) photographer needs to do. It has a PhotoShop like interface (which isn't
necessarily a good thing) and a fairly complete set of tools including curves, levels,
histograms, color correction, layers, filters, cropping tools, selection tools, cloning
tools and all the other essential features that an image editor needs. Here's where it
gets difficult to draw the line and not start writing the manual!
